 |
| Home |
| Assembly Notes |
| More Speed |
| More Power |
| An Accurate Speedometer |
| Relocate Controller |
| 72 Volt Mod. |
| Technical Notes |
| My Repair Record |
| Environmental Issues |
| Michigan Moped Law |
|
|
The speedometer on the XB-500 bike is only accurate at 0 KPH. When you engage the throttle, the speedometer indicates about 30 percent higher speed than you are actually going. When you release the throttle, the indicated speed drops, but still indicates more than 10 percent higher than actual speed.
Before any real appraisal of the bike can be done, one must
have an accurate indication of speed and distance. I decided to install
a bicycle speedometer on my XB-500. They are reasonably priced, (about
$15.00), and can be calibrated very accurately. I bought the one I
installed at K-Mart. It's a Bell SpinFit, and in addition to indicating
the speed, it can also display all of the following:
- Trip Distance
- Trip Timer
- Trip Average Speed
- Trip Maximum Speed
- Odometer (Total Distance)
- Time of Day (12 or 24 hour mode)
- Miles / Hour or Kilometers / Hour
The unit consists of a Display Module, the mount for the display (which also serves as the connector to the sensor), a hall effect speed sensor, and a small magnet which must be attached to the wheel. It comes with very nice instructions for installation.
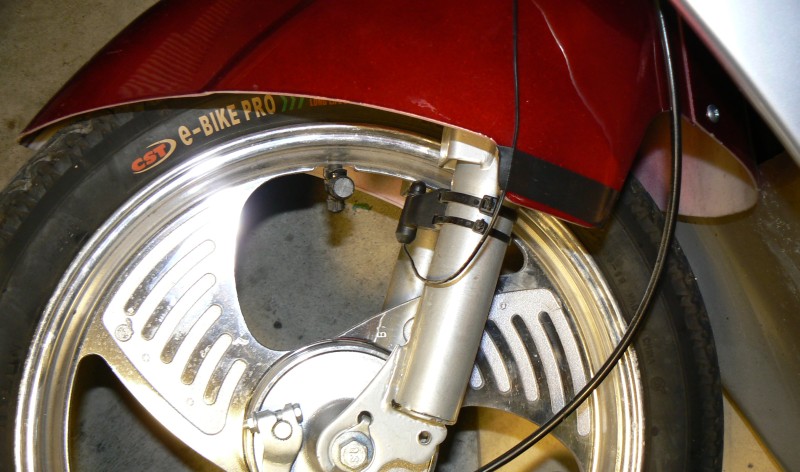
I started by mounting the speed sensor to the left front fork of the bike, using the Ty-Wraps supplied. Since there are no spokes on the wheel, I had to mount the magnet to the valve stem of the front tire. I used a thin Ty-Wrap to do this. The instructions tell you to mount the sensor so that the magnet passes within 5mm of the sensor. The photo below shows my installation.
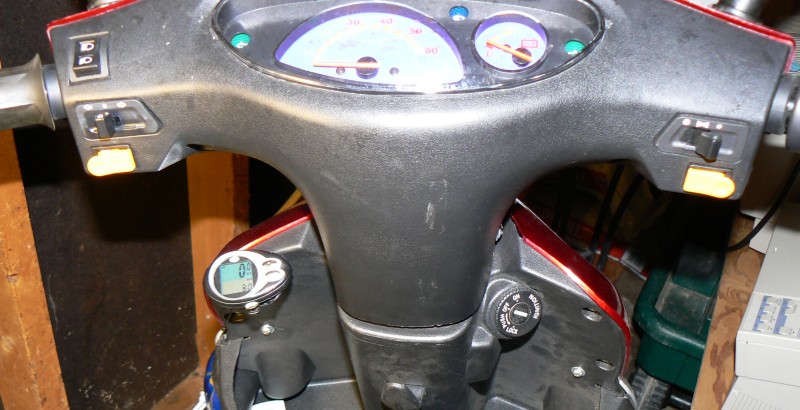
I then removed the front shroud from the bike and ran the sensor wire and the mount up along the fork, and brought it out on the left edge of the dash panel just above the "Glove Compartment". Since the mount for the display is meant to be clamped on a bicycle handlebar, I had to cut part of the clamp away, and used a sheet metal screw to secure it to the top edge of the dash panel.
Now, with the speedometer installed, I had to calibrate it. This is quite easy, or so I thought. When you first install the battery in the display unit, it resets itself, and the first thing you enter is the wheel size. There is a chart in the instruction manual which gives you the number to enter for various bicycle tire sizes. Unfortunately, the chart does not give a number for a 16 inch wheel. But don't worry, because it turns out that the number you enter is the circumference of the tire. Great. To find my number, I just got out a tape measure, and wrapped it around my tire.
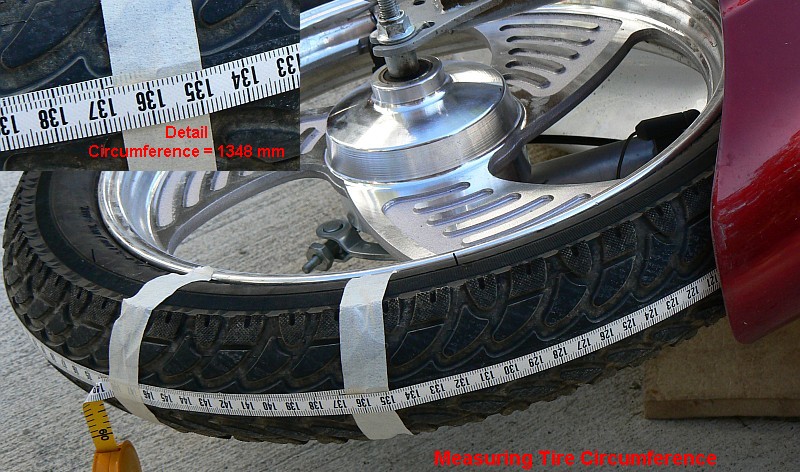
My tire measured 1348 mm, so that's the number I entered. Wow, that was easy. But I had to be convinced that my measurement was accurate. So I went down to the high school and got onto the quarter mile running track. I figured I would drive around the track four times, and the odometer should register one mile as I crossed the start/finish line. Was I right? Noooooooo!
When I was about 100 feet from the mile marker on the track, I looked down at the speedometer. It had already flipped over to 1.0! What did I do wrong. After repeating the road test twice more, I got the same result. I marked the spot where I registered 1 mile, and the test repeated itself within 4 feet both times. I was over 200 feet from the one mile mark.
Finally, I felt I had the answer. I had measured the circumference of the tire with the bike laying on it's side. But when there is weight on the tire, it will compress, and the apparent circumfrence will be smaller. OK, but how to measure the difference?
I went back home. I checked the tire inflation and set it to
exactly 35 PSI. I put a dab of red stamp-pad ink on the tread
 of my tire.
Then I sat in a normal riding position on the bike, and drove slowly
forward, leaving several evenly spaced red marks on the sidewalk, at
intervals of about 1300 mm, with a nicely defined tread mark. I got out
my tape measure again, and measured between two identical points on two
of the spots. My average of two measurements was 1287 mm. Wow? what a
difference between a tire under load, and one with no load.
of my tire.
Then I sat in a normal riding position on the bike, and drove slowly
forward, leaving several evenly spaced red marks on the sidewalk, at
intervals of about 1300 mm, with a nicely defined tread mark. I got out
my tape measure again, and measured between two identical points on two
of the spots. My average of two measurements was 1287 mm. Wow? what a
difference between a tire under load, and one with no load.
I re-calibrated my speedometer with the new number, went back to the track and tried again. This time, I went two miles, and was off by less than 3 feet. Well now.... 3 feet divided by 10560 feet (2 miles)? Wow, that's about .03%. The markings on that track are pretty accurate!
Now that I have an accurate speedometer on my bike, I'm wondering about some of the claims that people are making about adding batteries to attain higher speeds. I know that in at least one thread on visforvoltage.org, a rider claims to have attained 37 mph by adding two batteries. I don't believe that person has an accurate speedometer, because on my xb-500, the maximum flat road speed with the 48 volt system is 19.6mph. After adding one battery, with a 60 volt system fully charged. my flat road speed was just under 24mph. I measured my speed by driving around a 1/4 mile circular track and taking the average speed for one lap, which assumes that the effect of wind would average out over the entire course.
I hope that my efforts will help others who are doing modifications to assess their results in a more scientific manner.